
SwiftUI Modifiers Deep Dive: contextMenu
Published on Sep 18, 2024Get a quick glimpse of how Tiny Currency simplifies currency conversion with up to date rates, multi-currency support, and easy-to-use widgets. Perfect for on-the-go use, our app ensures you're always prepared, no matter where your travels take you.
📱 iOS 13.0+
On this deep dive, we are exploring the contextMenu SwiftUI modifier, which was added in iOS 13.0.
Apple's Documentation
Use this modifier to add a context menu to a view in your app’s user interface. Compose the menu by returning controls like Button, Toggle, and Picker from the menuItems closure. You can also use Menu to define submenus or Section to group items.
The following example creates a Text view that has a context menu with two buttons:
Text("Turtle Rock")
    .padding()
    .contextMenu {
        Button {
            // Add this item to a list of favorites.
        } label: {
            Label("Add to Favorites", systemImage: "heart")
        }
        Button {
            // Open Maps and center it on this item.
        } label: {
            Label("Show in Maps", systemImage: "mappin")
        }
    }
Usage
Context menus are great to expose some additional functionality in specific contexts, although the downside is that it is not as obvious to the user.
A good example here would be messaging apps. Long pressing on a message would bring up additional actions such as delete, edit, unsend etc.
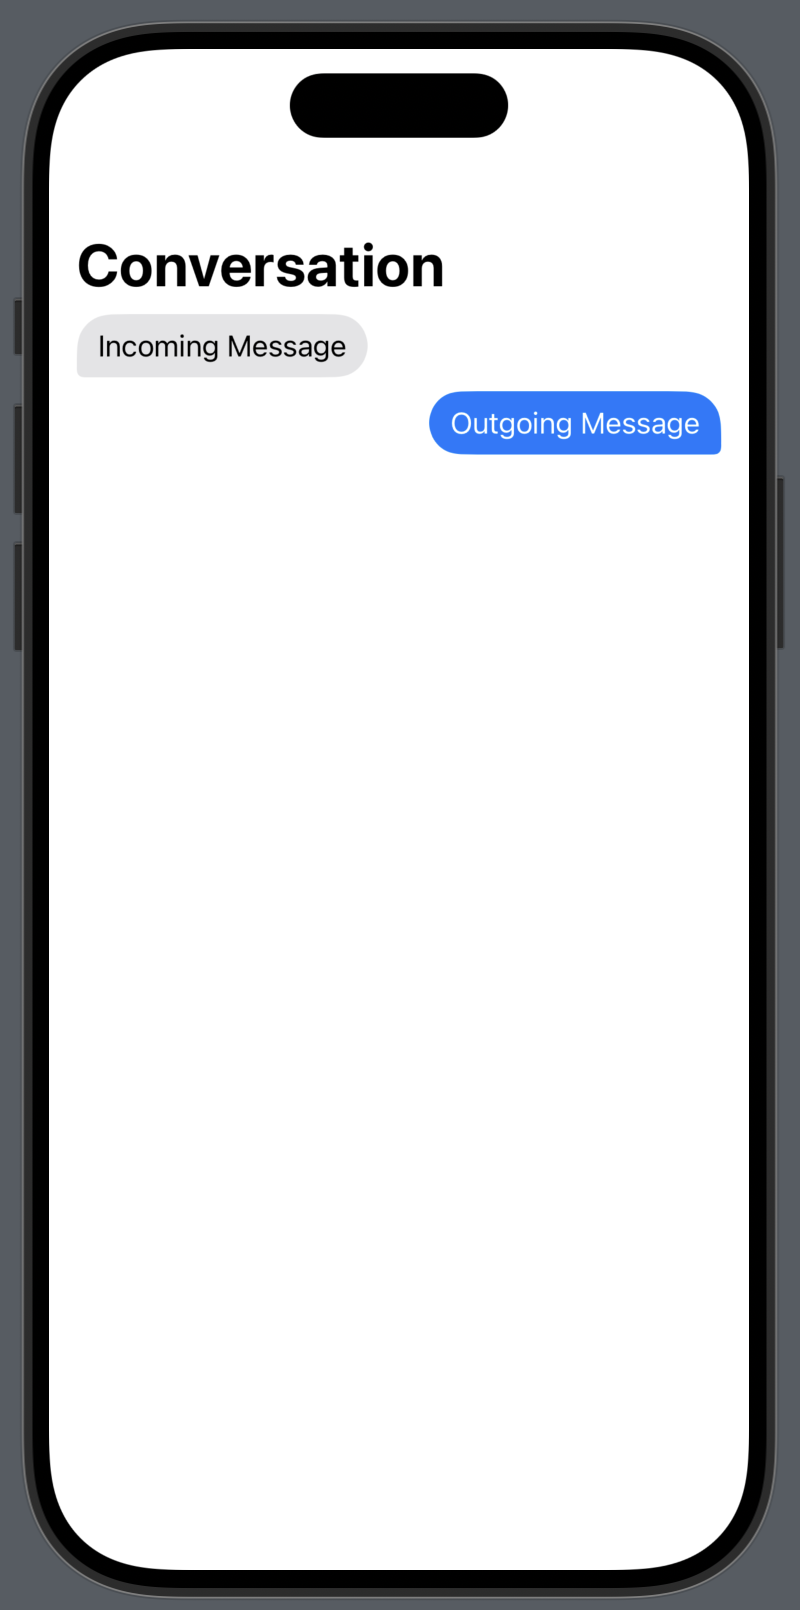
Let's build a simple conversation list to show how context menus could work.
First, let's define a Message like so:
struct Message: Identifiable {
    enum Direction {
        case incoming, outgoing
    }

    let id = UUID()
    let text: String
    let direction: Direction
}
Now we can create a simple conversation list:
struct ConversationView: View {
    var messages: [Message] = [
        Message(text: "Incoming Message", direction: .incoming),
        Message(text: "Outgoing Message", direction: .outgoing)
    ]

    var body: some View {
        NavigationStack {
            ScrollView {
                ForEach(messages) { message in
                    MessageBubble(message: message)
                        .contextMenu {
                            Button("Delete", role: .destructive) { }
                        }
                }
            }
            .navigationTitle("Conversation")
        }
    }
}
 | 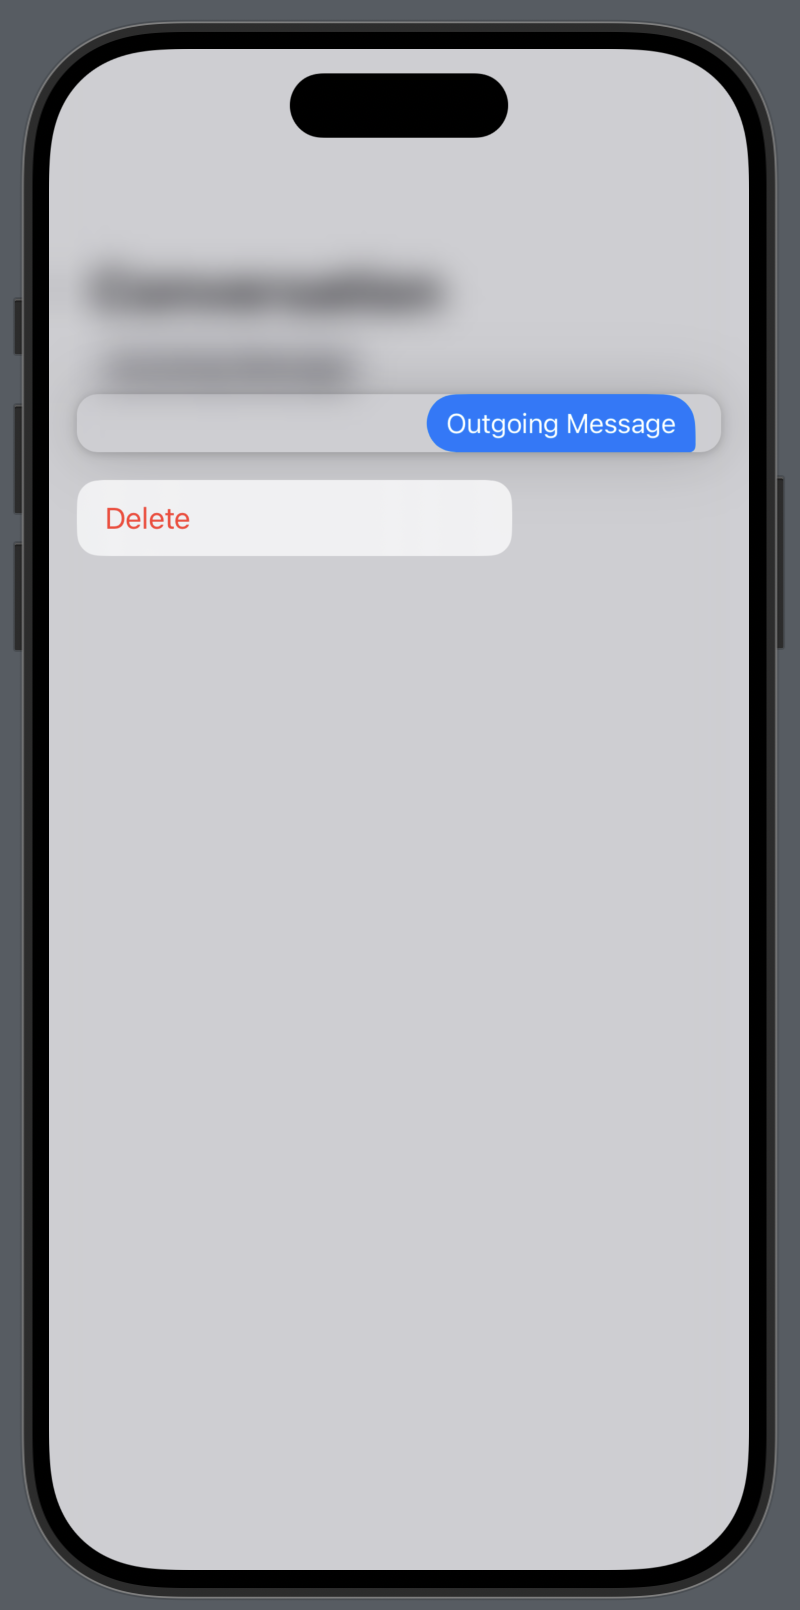 |
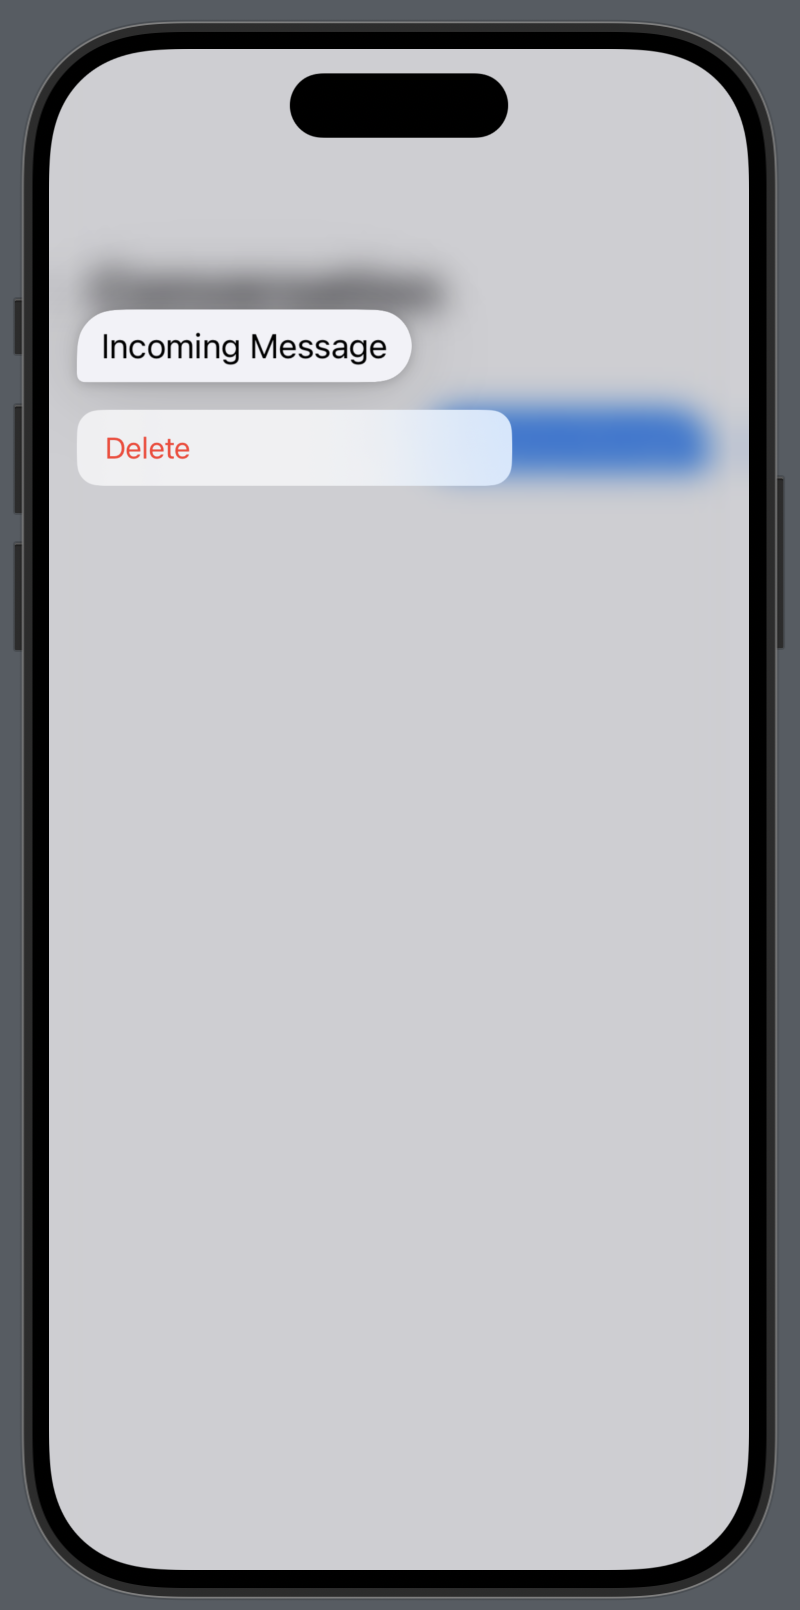
As you can see above, we have a conversation list and a context menu, but our context menu is taking up the entire space of the row.
The MessageBubble view handles all the spacing necessary to move the message to the leading or trailing side of the view depending on the message direction.
Luckily, SwiftUI gives us an easy way to fix this issue without having to change the MessageBubble too much.
First, let's take a look at what MessageBubble looks like:
struct MessageBubble: View {
    let message: Message

    var body: some View {
        HStack {
            if message.direction == .outgoing {
                Spacer()
            }
            Text(message.text)
                .foregroundStyle(foregroundStyle)
                .padding(.vertical, 8)
                .padding(.horizontal, 12)
                .background(backgroundStyle, in: backgroundShape)
                .containerRelativeFrame(
                    .horizontal,
                    count: 4,
                    span: 3,
                    spacing: 0,
                    alignment: message.direction == .outgoing ? .trailing : .leading
                )
            if message.direction == .incoming {
                Spacer()
            }
        }
        .padding(.horizontal)
    }

    private var foregroundStyle: AnyShapeStyle {
        switch message.direction {
        case .incoming:
            return AnyShapeStyle(.primary)
        case .outgoing:
            return AnyShapeStyle(.white)
        }
    }

    private var backgroundStyle: AnyShapeStyle {
        switch message.direction {
        case .incoming:
            return AnyShapeStyle(.background.quaternary)
        case .outgoing:
            return AnyShapeStyle(.blue)
        }
    }

    private var backgroundShape: some Shape {
        .rect(cornerRadii: RectangleCornerRadii(
            topLeading: 20,
            bottomLeading: message.direction == .incoming ? 4 : 20,
            bottomTrailing: message.direction == .outgoing ? 4 : 20,
            topTrailing: 20
        ))
    }
}
Ok, so now that we how MessageBubble works, we can see that there are spacers in an HStack used to space out the message appropriately.
To fix the contextMenu preview issues, there is another simple modifier: contentShape.
We can simply apply a contentShape modifier to the MessageBubble prior to the framing:
Text(message.text)
    .foregroundStyle(foregroundStyle)
    .padding(.vertical, 8)
    .padding(.horizontal, 12)
    .background(backgroundStyle, in: backgroundShape)
    // Add the contentShape here, and use the same shape as the background above
    .contentShape(.contextMenu, backgroundShape)
    .containerRelativeFrame(...)
Once we set the contentShape for the contextMenu, it now looks like this:
 | 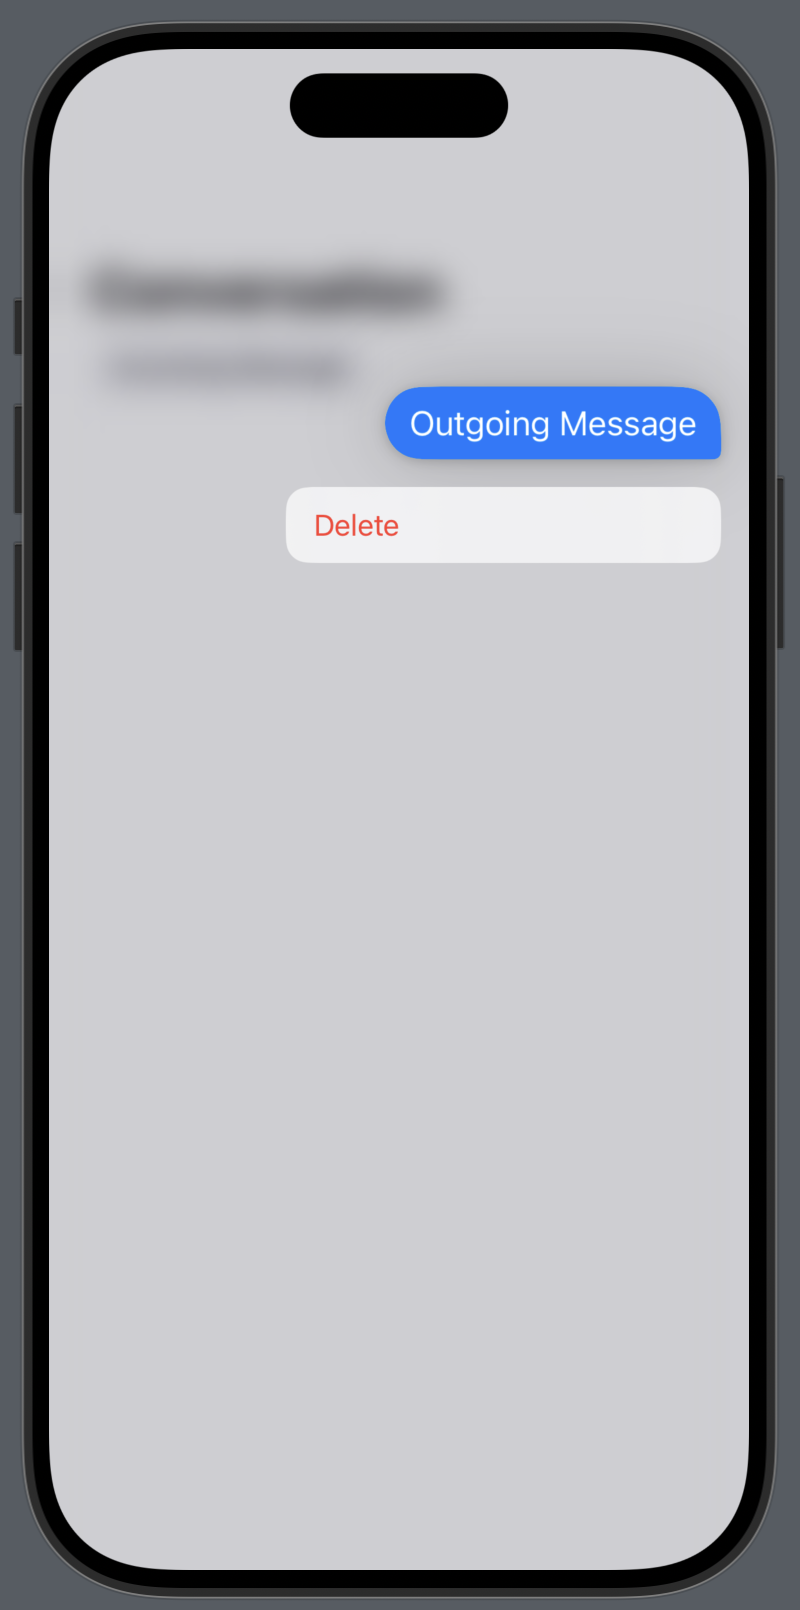 |
Awesome, our context menu is now shaped according to the MessageBubble, and it looks great!
Try it out yourself.